AI Chatbot
This feature is in Prototype and will be released very soon. APIs, visual appearance, and behavior may change. Reach out to the Embeddable team if you have questions or run into issues.
Let your end-users ask questions of their data in natural language — and get back both text explanations and live charts, without ever leaving your product.
The AI Chatbot is a ready-made chat widget, <em-ai-chat>, that works in plain HTML, React, Vue, Angular, or any other framework. End users type a question; the AI queries their data, renders charts, and can even add, edit, resize, or reorder charts on their Custom Canvas on their behalf.
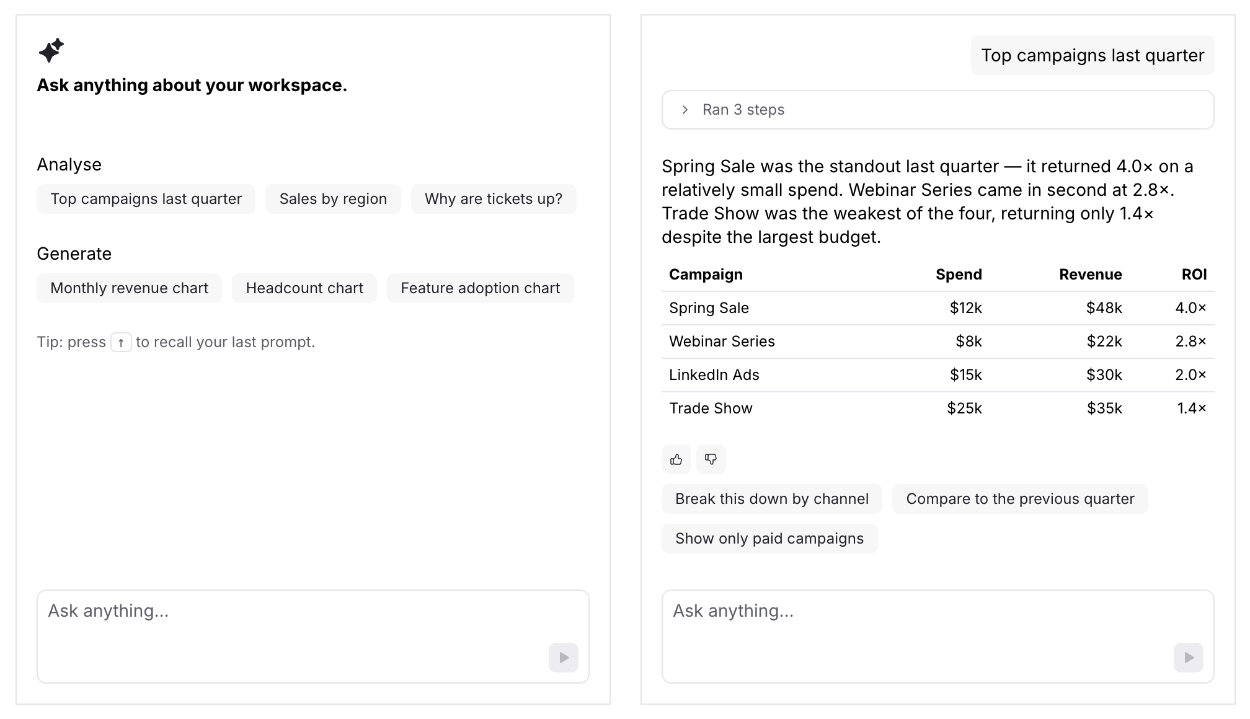
You can use it in two ways:
- Alongside a dashboard — render
<em-ai-chat>next to your<em-beddable>dashboard. The AI can answer questions and manage the user's Custom Canvas conversationally. - Standalone chat — render only the chat, with no visible dashboard. The AI still answers questions and previews charts in the conversation. See Standalone chat.
How it works
The AI Chatbot is made up of three pieces that work together:
<em-ai-chat>— a web component you drop into your page. It connects to the AI orchestrator over a WebSocket and authenticates using the same security tokens you already generate for your users.- AI Orchestrator — hosted by Embeddable. Receives messages from the chatbot, calls your LLM using the API key you've saved in the platform, queries your data models, and streams responses back.
- LLM config — a one-time API call (
POST /api/v1/llm-config) where you save your LLM provider, API key and extra configuration. This is how you bring your own key (BYOK).
End user types a question
  │
  ▼
<em-ai-chat>  (WebSocket)
  │
  ▼
AI Orchestrator  (Embeddable-hosted)
  │  ├── calls your LLM with the key saved in the platform (encrypted at rest)
  │  ├── queries the datasets you've enabled for Custom Canvas
  │  └── enforces row-level security from the security token
  │
  ▼
Response streamed back → text + rendered charts
Prerequisites
The chatbot gets its data access and its chart vocabulary from Custom Canvas. Before adding it, you need a dashboard with:
- Custom Canvas enabled — toggle it on beneath your main canvas in the builder.
- At least one dataset enabled for Custom Canvas — these are the only datasets the AI can query. Without them, it can't answer data questions.
- At least one chart template in the Template Library — these are the only chart types the AI can render. Without them, it can answer in text but can't show charts. The more templates you define (and the more open you leave their inputs), the more the AI can do.
- The dashboard published — the chatbot reads the published configuration, not your draft.
You do not have to render this dashboard in your product. Publishing it is what exposes its datasets and templates to the AI — whether or not your users ever see it. See Standalone chat.
Setup
Save your LLM configuration
Register your LLM provider and API key with the Embeddable platform. This is a one-time, per-workspace setup — the config is stored encrypted and reused for every chat session.
curl -X POST https://api.<region>.embeddable.com/api/v1/llm-config \
  -H "Authorization: Bearer <your-embeddable-api-key>" \
  -H "Content-Type: application/json" \
  -d '{
    "provider": "anthropic",
    "model": "claude-sonnet-4-5",
    "apiKey": "<your-llm-provider-api-key>",
    "systemPrompt": "You are a helpful analytics assistant."
  }'
region is us or eu — learn more.
| Field | Type | Required | Description |
|---|---|---|---|
provider | string | Yes | One of: anthropic, openai, google, openrouter, mistralai, bedrock, ollama |
model | string | Yes | A model ID supported by your chosen provider, e.g. claude-sonnet-4-5. If you pass an unsupported model, the API returns a 400 listing the accepted models for that provider. |
apiKey | string | Yes | Your LLM provider API key. Stored encrypted; never returned in full. |
temperature | number | No | Sampling temperature. Higher values produce more varied output. Provider default when omitted. |
maxTokens | integer | No | Maximum tokens generated per response. Provider default when omitted. |
systemPrompt | string | No | Prepended to every conversation to steer the assistant's tone and behavior. |
To check the current config, call GET /api/v1/llm-config (the API key is masked in the response). It returns 404 if none is set.
Authenticate with your Embeddable API key (not an end-user security token). This is a platform configuration call, not a per-user call.
Mint a security token
Each end user needs a security token, minted server-side with your Embeddable API key — exactly as you already do for dashboards (see the Tokens API). Use the embeddableId of the dashboard where you configured Custom Canvas:
curl -X POST https://api.<region>.embeddable.com/api/v1/security-token \
  -H "Authorization: Bearer <your-embeddable-api-key>" \
  -H "Content-Type: application/json" \
  -d '{
    "embeddableId": "<your-embeddable-id>",
    "user": "user-123",
    "securityContext": { "userId": "user-123" },
    "expiryInSeconds": 3600
  }'
There is no separate chatbot credential — the chatbot authenticates exclusively with this token, and row-level security from the token is enforced on every data query.
Load the component
Add this script to your page — no build step required:
<script type="module" src="https://unpkg.com/@embeddable.com/ai-chat@0.2.1/dist/ai-chat/ai-chat.esm.js"></script>Check npm (opens in a new tab) for the latest version. If you're using a bundler or framework, you can npm install @embeddable.com/ai-chat instead — see Framework integration.
Add the chat to your page
Choose between inline (fills its container) and modal (a floating panel that opens from a trigger element).
Inline:
<div style="width: 420px; height: 600px;">
  <em-ai-chat
    mode="inline"
    orchestrator-url="wss://api.<region>.embeddable.com/ws"
    embeddable-tokens='["<security-token>"]'
  ></em-ai-chat>
</div>
Modal:
<em-ai-chat
  mode="modal"
  placement="bottom-right"
  orchestrator-url="wss://api.<region>.embeddable.com/ws"
  embeddable-tokens='["<security-token>"]'
>
  <button slot="trigger">Open chat</button>
</em-ai-chat>
embeddable-tokens takes a JSON-encoded array of security tokens — the same tokens you pass to <em-beddable>. The tokens define what the AI can see: include a token for each embeddable you want it to answer questions about (and extend, where Custom Canvas is enabled). The first token is used as the credential for the chat connection.
Match tokens with an on-page dashboard. If the same page also renders one or more <em-beddable> dashboards, pass those same token(s) to embeddable-tokens. The chat only inspects <em-beddable> elements whose token matches one it was given — and that match is what unlocks the extra, dashboard-aware behavior: it can read the dashboard currently on screen (its widgets, queries, and data) and the Custom Canvas's current layout (e.g. how many columns are available), so it can size and position charts it adds sensibly.
The chat still works with a different or standalone token — it can add a chart to the canvas — but without a match it can't see the on-page dashboard's data or layout, so it can't position or resize what it adds effectively. This requirement is temporary; a future release will remove the need for the tokens to match.
Publish and test
Publish your dashboard in the builder, then open your product. Try asking a natural-language question — for example, "Show me revenue by region for last quarter". The AI will query your data and render a chart using one of your configured templates.
Standalone chat (no visible dashboard)
You can offer AI chat without rendering a dashboard at all — just the <em-ai-chat> component on its own. The Custom Canvas dashboard still does the work behind the scenes: it defines which datasets the AI can query and which chart templates it can render, so it must still be configured and published as described in Prerequisites.
In this setup, we recommend making the canvas read-only so the AI doesn't modify a canvas your users never see. Add customCanvasReadOnly: true when minting the security token:
{
  "embeddableId": "<your-embeddable-id>",
  "user": "user-123",
  "securityContext": { "userId": "user-123" },
  "customCanvasReadOnly": true
}
With a read-only token, the AI can still answer questions and preview charts in the conversation — it just can't add to or otherwise modify the Custom Canvas. Because the flag lives on the token, you can grant different users different levels of access with the same embedded widget.
The end-user experience
End users interact with the chatbot in plain language. The AI can:
- Answer data questions — retrieve and summarise data from any dataset enabled for Custom Canvas, presented as text or charts.
- Add charts to the canvas — place new charts based on what the user asks for.
- Edit existing charts — update a chart's dataset, measure, or filters on request.
- Resize, reorder, and delete charts — rearrange the canvas layout conversationally.
- Collect feedback — end users can rate each response with a thumbs up/down and leave a comment.
Canvas editing requires a token without customCanvasReadOnly — with a read-only token, the AI answers questions and previews charts but leaves the canvas untouched.
Component reference
Attributes
| Attribute | Type | Default | Description |
|---|---|---|---|
orchestrator-url | string | — | WebSocket URL of the AI orchestrator: wss://api.<region>.embeddable.com/ws |
embeddable-tokens | string | — | JSON-encoded array of security tokens. The first token is used as the credential for the connection. |
client-context | string | — | JSON-encoded client context — the same object you pass to your embeddables. Its timezone resolves dates consistently with the dashboard. |
mode | "inline" or "modal" | "inline" | inline fills its container; modal opens a floating, draggable panel from the trigger element |
placement | "bottom-right", "bottom-left", "top-right", "top-left" | "top-right" | Where the modal panel appears relative to the trigger element |
chart-preview-supported | "true" or "false" | "true" | Whether this client can render chart previews in the conversation |
Customizing the UI text
All user-facing text — the welcome message, input placeholder, and feedback dialog copy — can be overridden via the labels property. It's a JavaScript object property, not an HTML attribute:
const chat = document.querySelector('em-ai-chat');
chat.labels = {
  welcomeMessage: 'Hi! Ask me anything about your data.',
  inputPlaceholder: 'Type a question…',
};
Provide any subset of the keys below; omitted keys fall back to the defaults.
| Key | Default | Description |
|---|---|---|
welcomeMessage | (built-in greeting) | Message shown in the empty state before the first user message |
inputPlaceholder | "Ask anything..." | Placeholder text inside the message input |
feedbackTitlePositive | "Tell us what you liked" | Title of the feedback comment dialog after a thumbs-up rating |
feedbackTitleNegative | "How can we improve?" | Title of the feedback comment dialog after a thumbs-down rating |
feedbackPlaceholderPositive | "Share more" | Placeholder text inside the feedback comment input after a thumbs-up |
feedbackPlaceholderNegative | "Share more" | Placeholder text inside the feedback comment input after a thumbs-down |
feedbackDismiss | "Dismiss" | Label for the dismiss button in the feedback dialog |
feedbackSubmit | "Submit feedback" | Label for the submit button in the feedback dialog |
feedbackThanksForFeedback | "Thanks for your feedback" | Confirmation message shown after a written comment is submitted |
feedbackThanksForRating | "Thanks for your rating" | Confirmation message shown after only a thumbs up/down rating is given |
addToDashboardConfirmationText | "Shall I add this to your dashboard?" | Prompt shown alongside a generated chart, asking whether to add it to the dashboard |
addToDashboard | "Add to dashboard" | Label for the button that adds a generated chart to the dashboard |
addingToDashboard | "Adding to dashboard…" | Label shown on the button while the add-to-dashboard action is in progress |
newConversation | "New conversation" | Label for the button/action that starts a new conversation |
ratePositive | "Rate this positive" | Accessible label for the thumbs-up rating button |
rateNegative | "Rate this negative" | Accessible label for the thumbs-down rating button |
toolCallsThinking | "Thinking" | Status text shown while tool calls are in progress |
toolCallsRanStepsSingular | "Ran {count} step" | Summary text for a single completed tool call step ({count} is substituted) |
toolCallsRanStepsPlural | "Ran {count} steps" | Summary text for multiple completed tool call steps ({count} is substituted) |
addToDashboardMessageWithTitle | 'Add the chart "{title}" to the dashboard' | User-message text sent when clicking "Add to dashboard" on a titled chart ({title} is substituted) |
addToDashboardMessage | "Add the chart to the dashboard" | User-message text sent when clicking "Add to dashboard" on a chart without a title |
conversationTooLongError | "This conversation has become too long to continue. Please start a new conversation to keep chatting." | Shown when the conversation transcript grows too large to continue |
unknownError | "An unknown error occurred" | Shown when a server error arrives without a specific error message |
Slots
| Name | Description |
|---|---|
trigger | (modal mode only) The element that toggles the chat panel open and closed |
Theming
The chat's visual styling is controlled by --em-ai-chat-* CSS custom properties. If an <em-beddable> is present on the page, the chat automatically inherits its design tokens from the Remarkable UI (opens in a new tab) design system, so it matches your dashboard out of the box.
To customize further (or when there's no <em-beddable> on the page), set the variables directly on em-ai-chat to match your own design:
em-ai-chat {
  /* Shell */
  --em-ai-chat-shell-background: #ffffff;
  --em-ai-chat-shell-border-color: #e4e4ea;

  /* Input composer */
  --em-ai-chat-composer-input-border-color: #e4e4ea;
  --em-ai-chat-composer-input-border-color--focus: #2d52cc;

  /* Primary icon button (send / cancel) */
  --em-ai-chat-icon-button-primary-background: #2d52cc;
  --em-ai-chat-icon-button-primary-color: #ffffff;

  /* Panel size (modal mode) */
  --em-ai-chat-panel-width: 23.75rem;
  --em-ai-chat-panel-height: 32.5rem;
}
The full list of variables ships with the package — see em-ai-chat.tokens.css in the published package (opens in a new tab).
Framework integration
In React, Vue, Angular, or any other bundled app, install the package and register the custom elements once at startup:
import { defineCustomElements } from '@embeddable.com/ai-chat/loader';
defineCustomElements();
Then use <em-ai-chat> like any other HTML element:
return (
  <em-ai-chat
    mode="modal"
    orchestrator-url="wss://api.<region>.embeddable.com/ws"
    embeddable-tokens={JSON.stringify([token])}
  >
    <button slot="trigger">Chat</button>
  </em-ai-chat>
);Vite users — exclude the package from dependency pre-bundling, which otherwise breaks the component's lazy-loaded chunks:
export default defineConfig({
  optimizeDeps: {
    exclude: ['@embeddable.com/ai-chat'],
  },
});
Security
| Concern | How it's handled |
|---|---|
| Authentication | Exclusively via the security tokens passed in embeddable-tokens — no separate chatbot credential |
| Row-level security | Enforced on every data query using the claims in the security token |
| LLM API key | Stored encrypted in the platform; masked in API responses; never sent to the client |
| Canvas write access | Controlled per token via customCanvasReadOnly — the orchestrator denies canvas writes for read-only tokens |
| Cross-workspace isolation | The orchestrator rejects connections where tokens belong to different workspaces |
Related
- Custom Canvas — where you configure the datasets and chart templates the AI can use
- AI Endpoints — power your own chat UI instead of using the ready-made component
- Tokens API — how to generate the security tokens the chatbot relies on
- Row-level security — how per-user data access is enforced